Smoked Mackerel
2tbsp Creme Fraiche
1-2tsp Wasabi
squeeze of lime juice
salt and pepper
spring onions
Baby Gem Lettuce
Friday, 11 January 2013
Tuesday, 8 January 2013
Ice Cream
Basic Vanilla
Green Tea
Pooh Bear (Honeycomb)
Dulce De Leche
Blackcurrent
Tetleys Ice Cream? pannacotta?
Earl Grey Ice Cream? pannacotta? marcus wareing does this in his book (more like a set custard)
Green Tea
Pooh Bear (Honeycomb)
Dulce De Leche
Blackcurrent
Tetleys Ice Cream? pannacotta?
Earl Grey Ice Cream? pannacotta? marcus wareing does this in his book (more like a set custard)
Saturday, 5 January 2013
Banoffee Baked Alaska
A classic dessert from the 1970's, the baked alaska has somewhat lost it's original identity. Delmonicos in New York is the birth place of the Baked Alaska, created in 1867 and originally called Alaska Florida.


Baked Alaska is constructed with a sponge base, topped with fruit and ice cream, all of which is encased by swiss meringue and glazed. The original recipe used banana ice cream, but nowadays you usually find a vanilla ice cream centre.
My thought is to combine the original banana component with one of my favourite British desserts ..... BANOFFEE PIE! I could have a banana ice cream, a caramel ice cream or even a vanilla ice cream in order to to replicate the banoffee flavour profile. For my fruit layer, I only really have one choice......banana. This kicks the banana ice cream out of the picture. One of my favourite elements of banoffee, is the 'offee. In other words, that caramel you are left with after boiling a can of condensed milk! I love the texture of the caramel, but I would lose it if I used a toffee flavoured ice cream .........or would I?
Luckily for me, Haagen-Dazs do an unbelievable ice cream called Dolce de Leche. It is a toffee ice cream with blobs of that lovely caramel laced all the way through it. PERFECT! Two birds with one stone.
So, I have the fruit and Ice cream sorted, now for the base and the meringue. I feel that the classic sponge base in Baked Alaska doesn't do anything for textural contrast. So, I'm thinking a biscuity base similar to that found in a Banoffee Pie. Perhaps the addition of some almonds would also work nicely. I like almonds as their flavour isn't overly intrusive, compared to hazelnuts of peanuts for example.
Finally, I rekon a vanilla flavoured Italian meringue will finish off the flavour profile nicely!!!
Recipe and pictures to follow when I get round to trying this out!
Chocolate
Chocolate Making Process: Pod to Bar
- Cocoa pod picked
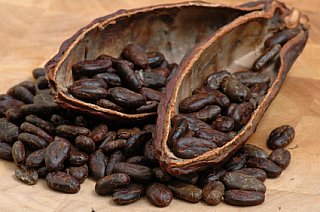
- Pod "shelled" to reveal cocoa bean
- Beans fermented (2 - 8 days) to develop sugars and prevent too much bitterness
- Beans dried
- Beans roasted to develop the chocolate flavour
- Beans shelled to reveal cocoa nibs
- Nibs ground to a fjne paste or liquid ("cocoa liquor")
- Cocoa liquor can either be sold in solid blocks or it can be heated to separate the cocoa butter from the cocoa solids (essentially cocoa powder)
- Cocoa liquor, cocoa solids, cocoa butter, sugar, dairy, fat and flavourings etc can be combined in various combinations to make many chocolate products.
 |
| 1. Cocoa pod picked |
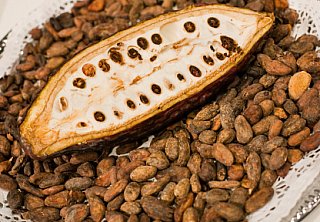 | ||||
| 2. Pod "shelled" to reveal cocoa bean 3. Beans fermented 4. Beans dried |
 |
| 5. Beans roasted |
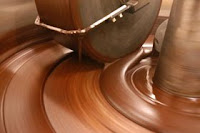 | ||
| 6. Beans shelled to reveal cocoa nibs 7. Nibs ground to make "cocoa liquor" |
 |
| Cocoa Powder |
 |
| Cocoa Butter |
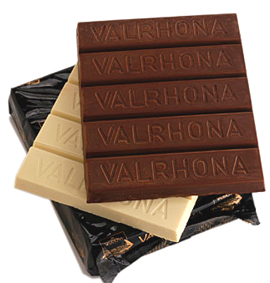 |
| Chocolate |
Tempering Chocolate
This was my primary reason for writing this section of the blog as I have only now got a proper understanding of the science behind tempering. I knew the principals before, but never really knew WHY we heat and cool chocolate to precise temperatures in order to temper it!..........Here's how you do it and why;
When you buy a good quality bar of chocolate from the shops, it is already in a state of temper. That is, shiny, crisp and capable of withstanding standing temperatures up to 34 degrees C before it melts. If we were to heat and melt this bar of chocolate above 36 degrees C, then let it
cool to below 17 degrees C, we would end up with chocolate that is crumbly, dull in appearance and it would simply melt with ease in
your hands.
So, how do you get chocolate into a state of temper? This is where temperature manipulation of the fat crystals in the cocoa butter comes in. Cocoas butter is comprised of 6 different types of fat crystals, all with different characteristics. These crystals and their characteristics are outlined below.
Crystal Melting Temp Characteristcs
I 17°C (63°F) Soft, crumbly, melts too easily.
II 21°C (70°F) Soft, crumbly, melts too easily.
III 26°C (78°F) Firm, poor snap, melts too easily.
IV 28°C (82°F) Firm, good snap, melts too easily.
V 34°C (94°F) Glossy, firm, best snap, melts near body temperature (37°C).
VI 36°C (97°F) Hard, takes weeks to form.
Of these 6 fat
crystals, only 1 is desirable for tempered chocolate. This is crystal V, the "beta" crystal.
Proper tempering is all about forming the type V crystals. This provides the best appearance, mouthfeel and creates the most stable crystals so the texture and appearance will not degrade over time. To accomplish this, the temperature is carefully manipulated during the crystallization.
The chocolate is first heated to melt all six forms of crystals (heat dark chocolate to 45 - 50 degrees C, milk chocolate to 40 - 45 degrees C, and white chocolate to 40 degrees C). Then the chocolate is cooled to allow crystal types IV and V to form (VI takes too long to form) (cool dark chocolate to 28 - 29 degrees C, milk chocolate to 27 - 28 degrees C, and white chocolate to 24 - 25degrees C). At this temperature, the chocolate is agitated to create many small crystal "seeds" which will serve as the nuclei to create small crystals in the chocolate. The chocolate is then heated to eliminate any type IV crystals, leaving just the type V (heat dark chocolate to 31 - 32 degrees C, milk chocolate to 30 - 31 degrees C, and white chocolate to 27 - 28 degrees C). After this point, any excessive heating of the chocolate will destroy the temper and this process will have to be repeated.
Two classic ways of tempering chocolate are:
Working the melted chocolate on a heat-absorbing surface, such as a stone slab, until thickening indicates the presence of sufficient crystal "seeds". The chocolate is then gently warmed to working temperature.
Stirring solid chocolate into melted chocolate to "inoculate" the liquid chocolate with crystals (this method uses the already formed crystal of the solid chocolate to "seed" the melted chocolate).
It IS possible to melt tempered chocolate whilst still keeping it in temper. You have to melt the chocolate carefully to the tempering range (31 - 32 degrees C for dark chocolate etc) in order to maintain as many V crystals as possible. However, if the chocolate is heated above this range, the V crystals will be destroyed and you will have to re-temper the chocolate the hard way!
Stocks
1. STOCKS
They form the foundation of many sauces and dishes after all. What is a risotto without a good stock? Rubbish, thats what! As well as good flavour, a homemade stock should provide a good amount of body resulting from good gelatin extraction from animal bones and cartilage. Stock pots, cubes and powders simply don't provide this gelatin content which is essential to providing reduced sauces with nice syrupy consistencies. On many occasions, I have attempted to make a nice sauce for a steak or chicken using one of these pots/cubes/powders. However, I always end up with a watery, flavourless mess. The closest thing you can get in the shops are perhaps ready made stocks. I would advise reducing these down to intensify their flavour and improve their consistency. Now, I understand that many people will be thinking, "why doesn't he just thicken his sauces with cornflour, arrowroot or some form of roux?". Well, it all comes down to flavour. As I've said, you just can't beat the flavour of a home made stock. Besides, if the pros can do it, I want to do it too!
The most fundamental stocks are chicken (white and brown), veal/beef (white and brown), fish (fumet) and vegetable (nage). It is my quest to find out the holy grail of stock recipes and techniques which will open up a new world of wonderful recipes and flavours!
I'll begin with chicken stock. There are two types of chicken stock, white and brown. White chicken stock basically involves simmering raw chicken carcasses in order to extract gelatin and create a flavourful, but delicate stock. This can then be used as the basis for soups and sauces which do not necessarily call for a roasted or overpowering chicken flavour. Thats where brown chicken stock comes in. The same principals apply as for white chicken stock, except now the chicken carcasses are pre-roasted before simmering in water. The end result is a strongly flavoured liquid with the pure essence of roasted chicken. I would recommend using this stock in recipes or sauces in which a chicken flavour is desired. Depending on the recipe it is to be used in, vegetables and flavourings can be simmered along with the chicken to make a more complex flavour profile.
Lets look at white chicken stock. I'm sure everyone that has ever looked at a classical white stock recipe, has seen the word "Mirepoix". This is basically a combination of chopped carrots, onion and celery. They tell you to simmer the bones along with these vegetables to create your stock. In my opinion, for the home cook at least, leave out these aromatics at this stage and just make a pure chicken stock! This way, you can adapt the stock according to whatever you are making by infusing it with vegetables, herbs or spices which are relevant to your recipe. For example, you could infuse it with tarragon/fennel for fish, thyme/root vegetables for chicken, rosemary/garlic for lamb etc. You get the idea, just have a play around!
I mentioned that you would need full chicken carcasses for your stock. Although this is true, I would strongly recommend using chicken wings as the primary element along with leftover chicken carcasses (don't use carcasses left over from a roast chicken as we do not desire a roasted flavour here). Here is the recipe I use;
WHITE CHICKEN STOCK
Ingredients
2kg chicken wings and carcasses
3l cold water
Simply put all of the chicken in a large stock pot and cover with the cold water. Slowly bring to a simmer, skimming any fat or scum that rises to the surface. Gently simmer for 3-4 hours (don't boil the stock as this will create lots of turbulence within the pot and cause some fat and scum to boil into the stock, making it cloudy). Strain the stock and chill. The stock should set like a jelly when cold.
Store in the fridge for up to 3 days or in the freezer for 3 months.
You can either throw the bones away or do what I do and pick the meat from the chicken wings and use them to fill out dishes. Of course, they do not have much flavour as most of it was extracted during the stock making process, but waste not want not. You can mix them into dumplings and serve them with the stock in a chicken noodle soup or even mix the meat through a risotto. Do whatever you fancy.
We now enter the realm of BROWN chicken stock. Here, the previous statement about leaving out vegetables doesn't apply. Now we are after a roasted characteristic along with the flavour of the meat/bones we are using for the stock. Roasting onions for example, gives the most amazing sweet roasted flavour.
The following recipe for brown chicken stock is taken from Heston Blumenthal. The chicken wings and carcasses are roasted after being sprinkled with skimmed milk powder. The idea behind this is to increase the roasted flavour by introducing more sugars and proteins contributing to the Maillard reaction. This is the chemical reaction that occurs between sugars and proteins in meat, once heated above 154 degrees Celcius. This is what creates that wonderful roasted flavour in meat! It is not essential to include the skimmed milk powder, but it does help. Heston also suggests using a pressure cooker in order to keep in as much flavour and aroma as possible. If using a pressure cooker, bring up to maximum pressure, then cook on a low heat for 2 hours only.
BROWN CHICKEN STOCK
Ingredients
2kg chicken wings
1 left over carcass from a roast chicken
3l cold water
75g carrot sliced
150g onions finely sliced
100g button mushrooms quartered
2 cloves of garlic lightly bashed
2tbsp skimmed milk powder (optional)
Pre-heat an oven to 200 degrees Celcius. Sprinkle the chicken wings with skimmed milk powder (if using) and roast in the oven for about an hour until brown all over. Meanwhile, slowly caramelise the onions in a little light olive oil. Add the carrots and caramelise, then add the mushrooms and garlic. cook until the mushrooms are soft. Add the roasted chicken wings and the chicken carcass then add the cold water. 'Deglaze' the roasting pan with a little cold water and add to the stock pot (deglazing is the posh term for adding a cold liquid to the hot caramalised bits that have stuck to the roasting dish during the roasting process. Scrape all the bits from the bottom with a wooden spoon. This should cause the caramelised bits to disolve into the water. We are ensuring that no flavour is thrown away!). Slowly bring to a simmer and skim any fat or scum. Simmer for 4-6 hours. Strain and chill before either keeping in the fridge or freezer. Again, this stock will have a wonderful gelatinous quality.
I made this yesterday and made a roast chicken risotto with tarragon and the meat from the leftover chicken wings.....TIDY!
I would not recommend using this stock for reduction sauces as the flavour is so intense even before any reduction takes place. If reduced (typically by half), the flavour is quite overpowering and can destroy a sauce. I recommend using the white chicken stock, either on its own, or a combination of white stock and brown stock in order to dilute the flavour whilst still giving you the gelatin content required for a lovely sauce consistency.
One final note...please do not add any salt to your stocks! If you perfectly season the stocks as they are, by the time you reduce them (if doing so), the concentraion of salt will effectively increase as water evaporates from the stock, reducing its volume. The result will be a salty mess! Not pleasant.
Next, veal/beef stock. Veal stock is the preffered stock in professional French kitchens. It provides a more neutral flavour than beef stock made from older animals and it contains more collagen (present in the bones and cartilage of younger animals). This means that the finished stock has great body and a flavour that is not over powering. I have not found a white veal/beef stock recipe that excludes mirepoix, but I can't see why it would be completely necessary for the same reasons as the white chicken stock recipe above. The following stock recipe includes pigs trotters as an optional extra to create a more gelatinous stock. I recommend using 1 trotter if using veal bones and 2 trotters if using beef bones (as veal bones will create more gelatin). You can use a mixture of veal and beef bones if you wish.
WHITE VEAL/BEEF STOCK
3kg veal/beef bones (preferably marrow and knuckle bones)
1-2 pigs trotters (optional)
Cover all the ingredients with cold water and slowly bring to a gentle simmer. Skim any fat and scum that rise to the surface and simmer for about 4 hours for a good gelatin extraction. Top restaurants will make massive amounts of veal/beef stock and will simmer them for up to 48 hours. This just wouldn't be practical at home unless you were willing to pay the energy bill and stay awake for a couple of nightshifts! Also, simmering the bones for this length of time causes the stock to turn brown, even without roasting the bones before hand. Once you are happy with the stock, strain it and chill rapidly. Once the stock is cold, remove any solidified fat that has set on the surface. Store the stock in the fridge or freezer.
This white stock is typically used for veloutes, light sauces and soups.
As I said before, brown stocks are all about creating a rich roasted flavour. So, 'Mirepoix' can aid
the roasted flavour and provide a wonderful rounded flavour. The red
wine and tomato paste provide a deep colour and rich flavour.
BROWN VEAL/BEEF STOCK
3kg veal/beef bones chopped (preferably marrow and knuckle bones)
1-2 pigs trotters (optional)
2 onions chopped
2 carrots chopped
2 celery ribs chopped
1tbsp tomato paste
500ml red wine
small bunch of thyme
Pre-heat an oven to 200 degrees Celcius. Spread the bones and pigs trotters in a single layer onto a baking tray. if need be, roast in a couple of batches. Place the bones into the oven for approximately 1 hour, turning every so often to allow all sides to caramelise and brown. Place the roasted bones into a large stock pot and drain of most of the fat away. Leave a small amount of fat in the baking tray and add the chopped onions, carrots and celery. Allow the vegetables to caramelise either in the oven or on the stove top. Once browned, add the tomato paste and cook for a couple of minutes before adding the red wine to deglaze using a wooden spoon. Reduce the red wine by half then tip all the contents of the tray into the stock pot along with the bones. Add the tyme and cover the ingredients by about 30cm of cold water. Gently bring to a simmer and skim as before. Simmer for about 6 hours, strain and chill. Store the stock in the fridge or freezer.
Classically, this stock can either be used as it is, or turned into Espagnole (a brown stock thickened with a brown roux and simmered with more mirepoix and herbs. This is one of Escoffiers 5 mother sauces). This Espagnol can then be mixed with brown veal/beef stock in a ratio of 1:1, then reduced by half in order to create a demi-glace. The Espagnole can also be made into Jus Lie, which is in effect a short cut to making a thick sauce like a demi-glace. All you do here is thiken the Espagnole further with more brown roux.
The demi-glace is the chefs secret weapon in the kitchen. It is the chefs flavour bomb responsible for a number of rich meaty sauces. These derivatives of brown stock all take a long time to prepare and leave you with what only seems a small amount in the end. However, if it is amazing flavour and texture you are after, I'm afraid you will just have to get on with it!!!
FISH STOCK (Fumet)
white fish bones
butter
leek
onion
garlic
white wine
bay leaf
parsley
Method to come shortly...
Method to come shortly...
VEGETABLE STOCK (Nage)
leek
carrot
onion
celery
garlic
white peppercorns
star anise
fennel seeds
coriander seeds
chervil
Method to come shortly...
Method to come shortly...
All of the above stocks can be used for sauce making. I said before that I tried using the roasted chicken stock for a reduced madeira sauce. The end result was extremely over powering in flavour, but the consistency was excellent. This is an example of a situation where you may reach the desired flavour before you have reduced the sauce far enough to reach the correct consistency. In this situation, thickening agents should be called upon. These come in the form of starches and fats. Common starch thickening agents are roux (cooked equal parts of plain flour to butter), buerre manie (basically an uncooked roux), cornflour and arrowroot. The first two are very classical methods of thickening liquids and they do the job well. However, in recent times, chefs have turned away from these flour based agents as the flour can taint the flavour of sauces and turn them cloudy. Cornflour also causes sauces to turn cloudy, whereas arrowroot does not. Add as much thikening agent as you require in order to obtain the desired consistency.
Scallop Recipes
One of my favourite ingredients of all time...
Stephane Reynaud
Stephane Reynaud
Scallops with leek and chestnut
Ingredients
- 3 tbsp olive oil
- 3 garlic cloves, crushed
- 2 leeks, white part only, rinsed and sliced
- 2 spring onions, sliced
- 25g fresh ginger, peeled and chopped finely
- 200ml white wine
- 400g pre-cooked and peeled chestnuts
- 200ml whipping cream
- 18 scallops in the shell, cleaned, roes removed
- salt and freshly ground black pepper
Preparation method
- Heat half of the olive oil in a saucepan, add the garlic, leek, spring onion and ginger, lower the heat and fry for ten minutes.
- Add the wine and chestnuts and cook for another five minutes.
- Add the reserved roe and cream and cook for a further five minutes, then season with salt and freshly ground black pepper.
- Heat the remaining oil in a frying pan and fry the scallops over a high heat for two minutes on each side.
- To serve, pile the chestnuts onto each plate and top with three scallops per serving.
Gordon Ramsay
Jerusalem Artichoke Risotto with Scallops
Ingredients
- Olive oil
- 200g Risotto rice
- 500ml Chicken stock
- 200g Jerusalem artichokes, washed and sliced
- 100g Butter
- 100ml Double cream
- 25g Parmesan Cheese, grated
- 8 Scallops
- 50ml Sherry vinegar
- 50g Sugar
- Salt and pepper
Preparation method
COMING SOON...
Mackerel Recipes
Here are a few of my favourite Mackerel recipes. If I haven't made the whole dish, I have at least made a component or two and found it wonderful enough to be on this page. Mackerel is definately one of the most under-used ingredients that we have in abundance off our shores.
Mackerel Pate/Rillettes with wasabi and lime
Ingredients
Smoked Mackerel
2tbsp Creme Fraiche
2-3tsp Wasabi
Juice of 1/2 a lime
salt and pepper
To Serve
spring onions
Cucumber
Baby Gem Lettuce
(experiment with crisp items such as toast and crackers)
Raymond Blanc
Mackerel Pate/Rillettes with wasabi and lime
This is a recipe of my own. Very simple, but delicious and smooth thanks to the creme fraiche. It is common to use horse radish, but I went with a Japanese influence using wasabi instead, much to the same effect. I tried this with thin toasted bread, but I didn't think it worked. So, I recommend keeping with the oriental theme and using some other oriental crisp item to provide crunch. I also had it as just a salad with a honey vinaigrette which worked rather nicely. I think the sweetness of the honey really balanced the whole thing.
Ingredients
Smoked Mackerel
2tbsp Creme Fraiche
2-3tsp Wasabi
Juice of 1/2 a lime
salt and pepper
To Serve
spring onions
Cucumber
Baby Gem Lettuce
(experiment with crisp items such as toast and crackers)
Raymond Blanc
Grilled mackerel with soy lime dressing
Ingredients
- For the mackerel
- 250ml cider vinegar, or white wine vinegar
- 250ml water
- 5-6 pieces coriander stalks, washed
- 40g caster sugar
- 35g red onion, finely sliced
- ½ tsp whole pink peppercorns
- 3-4 lemon slices
- 2 whole mackerel, filleted, pin bones removed
- 1 tbsp oil
- For the soy and lime dressing
- 1 tbsp soy sauce
- 1 tbsp water
- 1 lime, juice only
- 1 tsp fresh root ginger, peeled, finely diced
- ½ tsp dark muscovado sugar
- For the fennel salad
- 1 tsp fennel seeds, soaked in water for 2 hours, drained and toasted in a dry pan
- 1 fennel bulb, finely sliced on a mandoline, slices soaked in ice-cold water for 20 minutes, drained
- 1 tbsp olive oil
- ½ lime, juice only
- 1 bunch rocket leaves
- 2 pinches sea salt
- 1 pinch cayenne pepper
Preparation method
-
For the mackerel, heat the cider vinegar, water,
coriander stalks, caster sugar, red onion, peppercorns and lemon slices
in a medium saucepan over a medium heat. Heat the mixture until just
warm (about 60C), then remove from the heat. Transfer the contents of
the pan to a flat, shallow container and set aside to cool.
-
When the mixture has cooled, place the mackerel
fillets into the container, flesh-side down. Set aside to marinate for
20 minutes.
-
For the soy and lime dressing, combine all the
dressing ingredients in a small pan and gently heat through until the
sugar has dissolved. Set to one side.
-
Preheat the grill to its highest setting.
-
When the mackerel fillets have marinated, remove
them from the marinade and pat dry with kitchen paper. Make several
diagonal scores in the skin, going across the length of each fillet to
stop them from curling up during cooking.
-
Brush a baking tray all over with oil. Arrange the
mackerel fillets onto the greased tray, skin-sides facing upwards. Place
under the grill and cook for 4-5 minutes, or until the skin is crisp
and the flesh is cooked through.
-
For the salad, combined. all the salad ingredients in a large bowl.
-
To serve, divide the fennel salad equally among
four serving plates. Place a grilled mackerel fillet on top of each
portion. Spoon the salad dressing around the edge of the plate. Scatter
over the remaining toasted fennel seeds.
Philip Howard
Cornish mackerel with oysters, mussels, winkles & samphire
Ingredients
- 3 x 300g mackerel
- For the smoked mackerel pâté
- 50g smoking chips
- 1 x 300g mackerel (from above)
- 1 tsp grapeseed oil
- salt, to season
- 2 native oysters, opened
- 1 tsp lemon olive oil
- 2g grated fresh horseradish
- 1 tsp superfine capers
- pinch celery salt
- squeeze lemon juice
- 40g crème fraiche
- For the muffins
- 115ml milk
- ½ tsp sugar
- 25g unsalted butter
- 10g fresh yeast
- 225g strong flour
- ½ tsp salt
- 50g cornmeal
- For the tartare of mackerel
- fillets of 1 x 300g mackerel (from above), skinned, cut into 5mm/ ½in dice
- 5cm/2in piece cucumber, peeled and deseeded, cut into 5mm/½in dice
- few pinches salt
- 1 tsp white wine vinegar
- pinch sugar
- 1 tsp superfine capers
- ¼ bunch chives, finely chopped
- For the oyster mayonnaise
- 2 rock oysters, opened
- 1 free-range egg, yolk only
- ½ tsp Dijon mustard
- squeeze lemon juice
- 1 ice cube
- 100ml grapeseed oil
- For the potato salad
- 4 new potatoes
- 1 free-range egg, yolk only
- ½ tsp Dijon mustard
- squeeze lemon juice
- pinch salt
- pinch freshly ground black pepper
- 100ml grapeseed oil
- 2 spring onions, finely sliced
- Beer batter for the mussels
- 225g plain flour
- 330ml lager
- pinch sugar
- pinch salt
- 20g yeast
- For the mussels and winkles
- 12 mussels
- 20 winkles
- 300ml vegetable oil, for deep frying
- 1 tsp lemon olive oil
- For the velouté
- ½ white onion, sliced
- ½ leek, sliced
- 1 celery stick, sliced
- 30g butter
- salt, to season
- smoked mackerel bones (from above)
- 300ml milk
- 50g potato, finely sliced
- For the samphire
- 40g samphire
- For the grilled mackerel
- fillets of 1 x 300g mackerel (from above)
- salt, to season
- grapeseed oil, to coat mackerel fillet
- To serve
- drizzle lemon olive oil
Preparation method
-
First prepare the mackerel. Fillet two of the mackerel. Trim one set of fillets for the grilled mackerel, and set aside in the fridge until needed. Skin the other set of fillets and cut into 5mm/ ½ in dice for the tartare. Set aside in the fridge until needed. Reserve the bones from the two mackerel, to smoke. Leave the third mackerel whole, ready to be smoked.
-
For the smoked mackerel pâté, set up a stove top
smoker with smoking chips of your choice and place over a medium heat.
(CAUTION: smoking generates a lot of smoke. Cook in a well-ventilated
area, and open the smoker outside if possible.) Score the whole
mackerel, rub it with the grapeseed oil and season generously with salt.
Once the smoker is smoking, place the mackerel inside along with the
bones from the two filleted mackerel. Smoke for 10 minutes, turn the
mackerel and continue to smoke for a further 10 minutes or when gently
prised, the flesh lifts away from the bones.
-
Add the two native oysters to the smoker for two minutes.
-
Remove the mackerel, oysters and bones from the
smoker. Place the smoked oysters in a bowl with the lemon olive oil and
set aside in the fridge. Set aside the smoked bones for the velouté.
-
Rest the smoked mackerel at room temperature for
five minutes, then carefully lift off the skin, remove the flesh from
the bones and place in a bowl. Pick through the mackerel to ensure no
small bones remain.
-
Add the grated horseradish, capers, celery salt,
lemon juice and crème fraiche and gently fold to create a loose and
textured pâté. Cover and set aside in the fridge until needed.
-
For the muffins, warm the milk, sugar, butter and
yeast in a pan to roughly body temperature (37C). Put the flour and
salt in a bowl, then pour in the warmed milk mixture. Mix the
ingredients together and once it begins to form a dough, knead the
mixture to a smooth dough. Set the dough aside in a warm place to prove
for an hour.
-
After an hour knead the dough a couple of times to
knock it back. Lightly dust a work surface with the cornmeal, and with a
rolling pin, roll the dough out to 1cm/½in thick. Cut out 2 x 4cm/1½in
discs. Prove for another 10 minutes. Heat a non-stick pan over a low
heat and add the muffins. Gently toast for five minutes each side, until
they are golden-brown and cooked through. Set aside covered with a
cloth.
-
For the tartare, sprinkle the diced cucumber with
salt and set aside for 30 minutes. After 30 minutes, rinse the cucumber
thoroughly, squeeze it out, then season with the vinegar and sugar and
set aside until needed.
-
For the oyster mayonnaise, blend the oysters, egg
yolk, mustard, lemon juice and an ice cube in a blender, to a smooth
purée. Gradually add the grapeseed oil, drop by drop, while the blender
is running, to create a light mayonnaise. Set aside in the fridge.
-
To finish the tartare, mix 100g of diced
mackerel with 60g of the oyster mayonnaise. Mix in the cucumber,
capers, chives and set aside until needed.
-
For the potato salad, cook the new potatoes in
salted water until tender. Drain and set aside to cool, peel the
potatoes then cut into a 5mm/½in dice.
-
Whisk the egg yolk, mustard and lemon juice
briefly. Add a pinch of salt and pepper and while whisking vigorously,
drizzle in the grapeseed oil to form a mayonnaise. Mix the diced potato
with enough mayonnaise to bind. Add the spring onions.
-
For the beer batter, whisk together the flour with
165ml of the lager. Add the sugar, salt and yeast and whisk to a
smooth paste. Add the remaining lager, whisk until homogenous and set
aside in a warm place.
-
For the mussels and winkles, heat a heavy based pan
over a medium heat, add a splash of water followed by the mussels and
winkles. Cover with a lid and steam for a minute or until the mussels
have opened. Drain the shellfish, reserving the liquor. Discard any
mussels that have not opened.
-
Remove the mussels and winkles from their shells.
Trim the tiny hard disc from the winkles’ ‘feet’. Set aside, covered in
the liquor.
-
For the velouté, gently fry half the onion, half
the leek and half the celery with 15g butter and a pinch of salt.
Add the smoked mackerel bones reserved from above, cover with the milk
and 300ml water. Bring to the boil, reduce the heat and simmer
for 20 minutes. Strain through a colander, then through a fine sieve,
reserving the liquid. Gently fry the remaining onion, leek, celery and
all the potato in the remaining butter, with a pinch of salt, until
tender. Add the simmered milk, bring to the boil and cook for 10
minutes. Transfer to a blender and blend to a smooth, velvety velouté.
Set aside until ready to serve.
-
For the samphire, blanch the samphire in boiling
water for 10 seconds. Drain, and immediately refresh in a bowl of iced
water. Drain again, and set aside for serving.
-
For the grilled mackerel, just before serving heat a
grill to hot. Season the mackerel fillets with salt, and brush lightly
with oil. Grill, skin side up, until cooked.
-
Just before serving, preheat the vegetable oil for
the mussels and winkles to 180C in a deep- sided, heavy based pan,
or alternatively use a deep fat fryer (CAUTION: hot oil can be
dangerous. Do not leave unattended). Dip the mussels into the beer
batter to lightly coat them and deep fry until golden-brown. Heat a
saucepan to a medium heat and add two teaspoons of the reserved
mussel/winkle liquor, then add the winkles. Heat them thoroughly before
serving, add the lemon olive oil to finish.
-
Before serving, gently warm the smoked oysters under the grill, halve the muffin and toast it. Heat the velouté to near boiling.
-
To serve, place half a toasted muffin on the side of each serving plate. Place a spoonful of smoked mackerel pâté onto it, and top with a smoked oyster. Spoon some potato salad next to the muffin, add some samphire and top with a fillet of grilled mackerel. Drizzle with the winkles and liquor and top with the deep-fried mussels. Add a spoonful of the mackerel tartare to each plate and place a cup of velouté by the side. Drizzle the velouté with lemon olive oil and serve.
Tom Kerridge - Shin of Beef with Carrot and Cabbage (Saturday Kitchen)
Here's a recipe by Tom Kerridge from Saturday Kitchen. For me, my interest in this dish lies in the CARROT! Last month I made Vichy carrots with caraway seeds. Here, Tom takes it a bit further by using whole large carrots and star anise as well. The braised shin is quite a standard preparation, but with the addition of root ginger to give some background warmth. I have used ginger in similar dishes and I can say that it works very nicely.
I've got a feeling Tom maybe sous vides the carrot in the restaurant....I may be wrong
Shin of beef with ginger, carrot and cabbage
Ingredients
- For the beef shin
- 6 x 225g pieces beef shin
- 750ml red wine
- vegetable oil, for frying
- 200g onion, roughly chopped
- 150g carrot, roughly chopped
- 150g celery, roughly chopped
- 1½ litres veal or beef stock
- 5 bay leaves
- 1 clove
- 1 tbsp white peppercorns
- 1 bunch thyme
- 3 tsp sea salt
- For the carrots
- 5 carrots
- 125g butter
- 75g sugar
- 1½ tsp salt
- 4 star anise (wrapped in muslin cloth)
- For the cabbage
- knob of butter
- 1 savoy cabbage, cut into large strips
- 2 tbsp toasted caraway seeds
Preparation method
-
Place the beef shins into a large bowl with the red wine, cover and leave to marinate in the fridge for 24-48 hours.
-
Strain the shins through a sieve, reserving the wine, then pat the shins dry.
-
Preheat the oven to 170C/325F/Gas 3. (Tom said to set the oven to 130-140C, cooking the beef for 3 1/2 - 4 hours).
-
Bring the red wine to the boil in a saucepan and skim off the scum that comes to the top.
-
Heat a large casserole until medium hot, add a
little vegetable oil and the onion, carrot, celery and ginger and cook
until browned.
-
In a separate frying pan, fry the shins in a little oil until browned very well.
-
When the shins have browned, drain them into a colander to get rid of any excess cooking fat.
-
Place the shin on the top of the vegetables in the casserole, cover with the skimmed red wine and veal stock.
-
Add the bay leaves, clove, white peppercorns, thyme and salt.
-
Bring to a simmer, cover with a lid then place in the oven to braise for 2½ hours.(Like I say, Tom said 3 1/2 - 4 hours).
-
When cooked, remove from the oven and leave the shins to cool down in the stock.
-
When cool, remove the shins from the stock and pass the stock through a fine metal seive into a saucepan and skim off any fat.
-
Place the pan of liquid back onto the heat and cook
over a medium heat until reduced to half the volume, then pass through a
fine sieve again.
-
To reheat the shin, warm it through in a covering of shin stock.
-
For the carrots, place all the ingredients into a
saucepan with 200ml water and cook over a medium heat until the
carrots are soft.
-
Turn the heat up and cook over a high heat until the liquid glazes the carrots.
-
For the cabbage, heat a frying pan until medium hot, add the butter and cabbage, cover and cook until just tender.
-
Stir in the caraway seeds, season and serve.
-
To serve, pile the cabbage onto the plate, place the carrot alongside and then finish with the beef shin and sauce.
Goan Lobster Curry - Atul Kochhar (From Saturday Kitchen)
Goan lobster
Ingredients
- For the lobster
- 4 live lobsters
- 150g desiccated coconut
- 4 dried bird’s eye red chillies
- 1 tbsp coriander seeds
- 1 tbsp cumin seeds
- 1 tsp black peppercorns
- 4 cloves
- 2 tbsp vegetable oil
- 2 onions, sliced
- 1 green chilli, finely chopped
- 1 garlic clove, finely grated
- 5cm/2in piece ginger, finely grated
- ¼ tsp ground turmeric
- 50ml tamarind pulp
- 300ml coconut milk
- 2 tbsp finely chopped coriander leaves
Preparation method
-
For the lobster, put the lobsters in the freezer for two hours until almost frozen - this will render them unconscious.
-
Add them to a large pan of boiling salted water and
simmer for two minutes. Remove the lobsters from the pan, immerse them
in chilled water and then drain.
-
Remove all the meat from the shells, keeping them
whole - discard the black intestinal vein that runs down the tail flesh
and the stomach sac and gills from the head. The meat will just be
blanched, not completely cooked at this stage.
-
Lightly dry fry the coconut in a deep frying pan, then tip it on to a plate and leave to cool.
-
Fry the dried chillies, coriander seeds, cumin
seeds, peppercorns and cloves in the pan for two minutes, or until
lightly colored. Remove and set aside to cool.
-
Heat the vegetable oil in a wok, add the onions and green chilli and fry for 5-7 minutes, or until light and brown.
-
Stir in the garlic, ginger and turmeric and fry for 2-3 minutes. Add the spice paste and cook, stirring for two minutes.
-
Add the tamarind pulp and simmer for 2-3 minutes.
Remove from the heat, cool slightly and then transfer to a food
processor to blend together with the coconut milk.
-
Add this to the pan, together with the lobster pieces and simmer for five minutes, or until just cooked through.
-
Sprinkle in the chopped coriander and set aside until ready to serve.
-
To serve, spoon the lobster onto four plates, pour over the sauce and serve with rice or chips alongside.
Nico Ladenis' Cooked Vinaigrette

I came across this in a Youtube clip. It sounds very interesting and versatile. I don't have quantities, so this will be a matter of taste. trial and error! I think I'm going to give it a go. It reminds me of a vegetable stock (nage) in which you store the stock with the vegetables and spices to infuse.
Cooked Vinaigrette
- Olive Oil
- White Wine
- White Wine Vinegar
- Onion
- Celery
- Green Pepper
- Red Pepper
- Carrot
- Bay Leaf
- Rosemary
- Thyme
- Tarragon
- Sugar
- Salt
- Black Peppercorns
Cook for about an hour, then infuse for another hour off the heat.
- Blend vinaigrette with tomato for a tomato coulis. Served with a fillet of Brill.
- Blend vinaigrette with orange juice. Served with a warm salad of Sole.
My Baileys Panna Cotta Recipe/Experiment
This is my own experiment/recipe in which I was trying to find the right gelatin/liquid ratio for panna cotta. I had some Baileys left over from Christmas, so I thought I should make use of it in this recipe! I know that a rough guide is about 1g of gelatin (leaves) per 100ml/g of liquid. I have used this before and found the texture ok, but maybe a bit firm for my liking. So, here I have upped the liquid slightly and also added cream cheese in an attempt to cut some richness from the Baileys. Here is the recipe I made up and what I thought of the end result.
300g Double Cream
100g Semi-skimmed Milk
50g Cream Cheese
100g Sugar
4g Gelatin Leaves (Dr Oetker)
50g Baileys
- Place the cream, milk, cream cheese and sugar in a saucepan. Heat and stir until the sugar is dissolved and the cream cheese has combined with the other ingredients.
- Meanwhile, soak the gelatin leaves in cold water for a few minutes until completely soft. Remove the gelatin from the water and squeeze any excess water out. Stir/Whisk the gelatin into the hot milk and cream mixture along with the Baileys.
- Sieve the mixture and pour into 4 dariole moulds (about 115ml/g each). Place in the fridge until set.
- To serve, dip the moulds in warm water briefly to release the panna cotta and turn out onto a serving plate. As well as releasing the panna cotta, dipping the moulds in warm water also gives a lovely sheen due to the slightly melted cream.
After about 2 hours in the fridge, I took one out and gobbled it all up. Here is what I thought and what I think I'd change;
Good texture (good gelatin/liquid ratio). Maybe a bit of a claggy finish on the palate. Could try reducing the sugar content, upping the milk and lowering the cream. Baileys flavour is not overwhelming, but I think it's strong enough. It needs an accompaniment to cut the richness (perhaps something acidic like lemon, orange, berries, coffee ...?)
After 12 hours in the fridge, I tested another one;
Texture had firmed up. Still a nice texture, but could do with a bit more of a wobble. Next time I will reduce the gelatin content. I think I will try the following recipe next time....
250g Double Cream
150g Semi-skimmed Milk
50g Cream Cheese
75g Sugar
3g Gelatin Leaves (Dr Oetker)
50g Baileys

Subscribe to:
Posts (Atom)